Prerequisites for running the integration in Genesys
Following is the list of items required
- An Internet browser (the latest version of Chrome, Firefox, or Microsoft Edge).To use WebRTC phones with the client, turn off the pop-up blocker in your browser.
- Per-user licenses for Genesys Cloud (Communicate or higher).
Configure OAuth Client
The following permission is required to configure the OAuth client
...
- Click Admin.
- Under Integrations, click OAuth.
- Click Add Client. The Client Details tab appears.
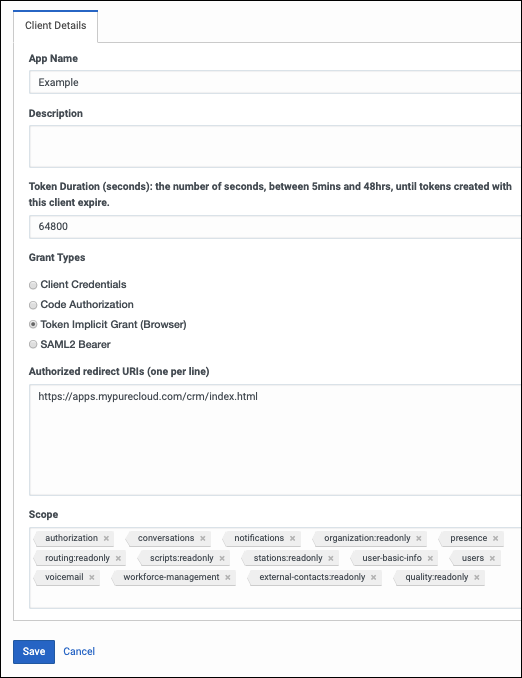
- Set the App Name to a descriptive to Expertflow or any meaningful name of the app.App Name is the name shown on the authorized OAuth client.
- (Optional) Type a brief description of the app in the Description box.
- Set the duration of time until tokens created with this client expire.
Accept the default duration, or enter a value between 300 and 172800 seconds. This duration sets the lifetime of the token to a maximum of two days or less.
Tip: Genesys recommends setting the token duration to 18 hours (64800 seconds). This duration generally causes the token to expire outside an agent’s normal workday. - Under Grant Types, select Implicit Grant (Browser).
Under Authorized redirect URIs, add https://apps.mypurecloud.com/crm/index.html, Customize the URI according to the customer Genesys Cloud region.
- Under Scope, add all required scopes.
- An OAuth client added to your Genesys Cloud organization (optional for some private versions) with the required scopes.
- conversations
- notifications
- organization:readonly
- outbound:readonly
- presence
- routing:readonly
- scripts:readonly
- stations:readonly
- user-basic-info
- users
- voicemail
- workforce-management
- external-contacts:readonly
- quality:readonly
- Click Save.
- A Client ID will be created that we use in the Framework.js file
...
- Click on the installed Private Genesys Cloud Framework

- Download the framework.js file.
- Open the framework.js file in some editor. Edit and update the App name & Client ID (Configured above in the document) in the file

- After editing and updating the framework.js file will look like the following

- Click the Configuration tab.

- framework.js File: Click Browse and upload a framework.js file.
...