Prerequisites for running the integration in Genesys
Following is the list of items required
- An Internet browser (the latest version of Chrome, Firefox, or Microsoft Edge).To use WebRTC phones with the client, turn off the pop-up blocker in your browser.
- Per-user licenses for Genesys Cloud (Communicate or higher).
Configure OAuth Client
The following permission is required to configure the OAuth client
...
- Click Admin.
- Under Integrations, click OAuth.
- Click Add Client. The Client Details tab appears.
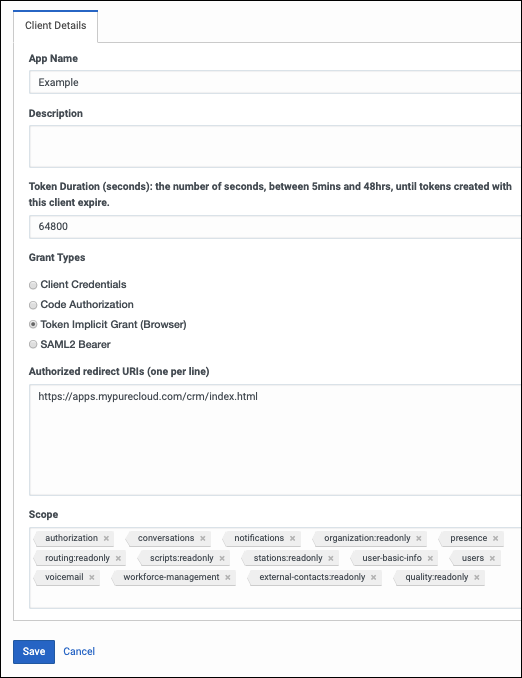
- Set App Name to a descriptive name of the app.
App Name is the name shown on the authorized OAuth client.
- (Optional) Type a brief description of the app in the Description box.
- Set the duration of time until tokens created with this client expire.
Accept the default duration, or enter a value between 300 and 172800 seconds. This duration sets the lifetime of the token to a maximum of two days or less.
Tip: Genesys recommends setting the token duration to 18 hours (64800 seconds). This duration generally causes the token to expire outside an agent’s normal workday. - Under Grant Types, select Implicit Grant (Browser).
Under Authorized redirect URIs, add https://apps.mypurecloud.com/crm/index.html, customized Customize the URI according to the customer Genesys Cloud region.
- Under Scope, add all required scopes.
- An OAuth client added to your Genesys Cloud organization (optional for some private versions) with the required scopes.
- conversations
- notifications
- organization:readonly
- outbound:readonly
- presence
- routing:readonly
- scripts:readonly
- stations:readonly
- user-basic-info
- users
- voicemail
- workforce-management
- external-contacts:readonly
- quality:readonly
- Click Save.
- A Client ID will be created that we use in the Framework.js file
Agent Permissions Required
The permission names appear in different formats. It all depends on where we access the permissions in Genesys Cloud, The integration looks for permissions, not roles, assigned to a user in Genesys Cloud.
...
- If we click in the last column the following options appear We can edit, Activate\Deactivate or delete the integration.
- If we click on the delete option, a pop-up box will appear requiring the confirmation of the deletion.

