Configure OAuth Client
The following permission is required to configure the OAuth client
- OAuth > Client > Add permission
Steps to configure OAuth client
- Click Admin.
- Under Integrations, click OAuth.
- Click Add Client. The Client Details tab appears.
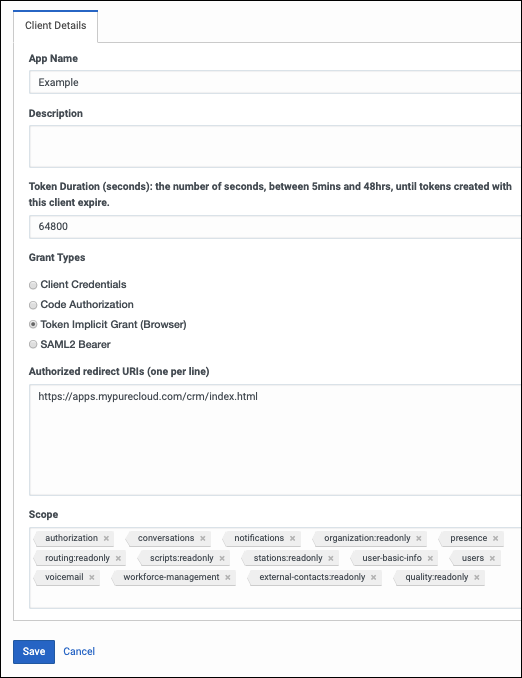
- Set App Name to a descriptive name of the app.
App Name is the name shown on the authorized OAuth client.
- (Optional) Type a brief description of the app in the Description box.
- Set the duration of time until tokens created with this client expire.
Accept the default duration, or enter a value between 300 and 172800 seconds. This duration sets the lifetime of the token to a maximum of two days or less.
Tip: Genesys recommends setting the token duration to 18 hours (64800 seconds). This duration generally causes the token to expire outside an agent’s normal workday. - Under Grant Types, select Implicit Grant (Browser).
Under Authorized redirect URIs, add https://apps.mypurecloud.com/crm/index.html, customized according to the customer Genesys Cloud region.
- Under Scope, add all required scopes.
- An OAuth client added to your Genesys Cloud organization (optional for some private versions) with the required scopes.
- conversations
- notifications
- organization:readonly
- outbound:readonly
- presence
- routing:readonly
- scripts:readonly
- stations:readonly
- user-basic-info
- users
- voicemail
- workforce-management
- external-contacts:readonly
- quality:readonly
- Click Save.
- A Client ID will be created that we use in the Framework.js file
...
| Permission | Required or optional | Feature | Description |
|---|---|---|---|
| ACD Screen Share > Session > View | Optional | Screen share | Allows an agent to screen share ACD interactions |
| Analytics > Conversation Aggregate > View | Optional | Evaluations | Allows an agent to view released evaluations in the User Inbox. |
| Analytics > Conversation Aggregate > View | Optional | Statistics | Allows an agent to see conversation statistics in the Agent Performance window. |
| Analytics > Queue Observation > View | Optional | Statistics | Allows an agent to see statistics for a queue before contacting the queue or transferring an interaction to the queue. |
| Analytics > User Aggregate > View | Optional | Statistics | Allows an agent to see user statistics in the Agent Performance window. |
| Cobrowse > Chat > Escalate | Optional | Co-browse | Allows an agent to use co-browse for chat interactions. |
| Cobrowse > Session > View | Optional | Co-browse | Allows an agent to use co-browse for voice or chat interactions. |
| Cobrowse > Voice > Escalate | Optional | Co-browse | Allows an agent to use co-browse for voice interactions. |
| Conversation > Call > Record | Optional | Call controls | Causes the Record icon to be clickable in the call controls in an agent’s client. |
| Conversation > Call Forwarding > Edit | Optional | Call forwarding | Allows an agent to use and edit call forwarding. |
| Conversation > Callback > Create | Optional | Callbacks | Allows an agent to schedule callbacks. |
| Conversation > Cobrowse > Add | Optional | Co-browse | Allows an agent to use co-browse for web messaging. |
| Conversation > Email > Create | Optional | Emails | Allows an agent to send emails on behalf of queues. |
| Conversation > Message > Create | Optional | SMS messages | Allows an agent to send SMS messages on behalf of queues. |
| Integration > Custom Embeddable Framework > Agent | Required | — | Causes This causes the client to appear in a private deployment of a Genesys Cloud Embeddable Framework integration. |
| Outbound > Contact > View | Optional | Screen pop | Allows an agent to see screen pops for outbound dialing. |
| Quality > Evaluation > Edit Agent Sign-off | Optional | Evaluations | Allows an agent to view released evaluation notifications in the User Inbox. |
| Quality > Evaluation > Edit or Quality > Evaluation > Edit Score | Optional | Evaluations | Allows a quality evaluator to view assigned evaluation notifications in the User Inbox. |
| Quality > Evaluation > View | Optional | Evaluations | Allows an agent to view released evaluation notifications in the User Inbox. |
| Routing > Agent > On Queue | Optional | Statuses | Causes On Queue to appear as a status and a status timer to appear in an agent’s client. |
| Routing > Queue > Join | Optional | Queues | Allows an agent to see which queues the agent is a member of and to select which queues to receive interactions from in the client. |
| Scripter > Published Script > View | Optional | Scripts | Allows an agent to see a script. |
| Voicemail > Voicemail > Receive | Optional | Voicemails | Allows an agent to receive personal voicemail notifications in the User Inbox. |
| Workforce Management > Agent Schedule > View | Optional | Scheduling | Allows an agent to view schedules in the client. |
| Workforce Management > Agent Shift Trade Request > Participate | Optional | Scheduling | Allows an agent to view shift trade request notifications in the User Inbox. |
| Workforce Management > Agent Time Off Request > Submit | Optional | Scheduling | Allows an agent to access time off notifications in the client. |
| Workforce Management > Shift Trade Request > Edit | Optional | Scheduling | Allows an administrator to view shift trade notifications in the User Inbox. |
...
- If we click in the last column the following options appear We can edit, Activate\Deactivate or delete the integration.
- If we click on the delete option, a pop-up box will appear requiring the confirmation of the deletion.
